Getting Started with ServiceNow Dynamic Translations
One of my favourite new features announced in the ServiceNow New York release is Dynamic Translations. If your ServiceNow instance has a user base that spans multiple countries you likely have the need to do some form of text translation such as field labels, choice values or emails.
Until now there has been no easy way to translate dynamic user-entered text such as text in description or comments fields without building a custom solution. The New York release changes that.
I want to show the 4 steps to quickly get started with Dynamic Translations. We're going to translate the Description field on Incident but the concept applies to any text field on a record.
Enable Plugin
Create a free IBM Watson account
Configure Dynamic Translation connection
Add dynamic translations to a field
1. Enable Plugins
The first thing you'll want to do is spin up a New York instance (you can request one now on https://developer.servicenow.com). You will then need to enable the Dynamic Translation plugin [com.glide.dynamic_translation]. The plugin has a dependency on Flow Designer and Integration Hub so these will also be enabled if not already.
2. Create a free IBM Watson account
Dynamic Translation uses either the Microsoft Azure or IBM Watson API for translations. You will need to register for one of these but both have free plans you can use. For this example, we're going to use IBM Watson which allows 1,000,000 Characters per Month for free.
Register for a free account here - https://www.ibm.com/watson/services/language-translator/ Once you confirm your email login to the IBM cloud homepage.
There will be a menu on the left for Service Credentials. There are two pieces of information to note: your API key and the API URL.
3. Configure Connection in ServiceNow
Head back on your ServiceNow instance, we're ready to configure the Dynamic Translation module to use your IBM Watson credentials.
Open the Translator Configurations module
Set IBM to Active and Default true
3. Now open the 'Credential and Connection Alias' module and Select 'IBMTranslation'
4. On the 'Connection' related list click 'New'
5. Enter a Name e.g. IBM and the Connection URL. This is the API URL you got from your IBM Cloud account. It may be different to the screenshot depending on your location.
Leave the rest of the options as they are and "Save"
Now on the same record Select the magnifying glass on the Credentials field.
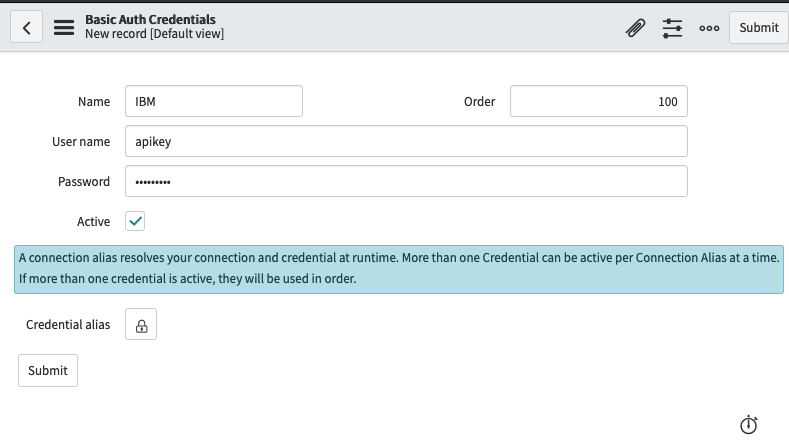
Click New and select Basic Auth Credentials form the list.
Name - IBM
User name - apikey
Password - your own IBM API key from step 1
(Don't get confused and put your API key in the user name field, it should be the text "apikey" lowercase no spaces)
Submit and Save the Connection record.
3. Add dynamic translations to a field
Head over to the incident form and Configure Dictionary on the 'Description'. Add the Attribute 'Dynamic Translation Enabled' and set it to true
You will now see a translation icon next to the field.
When you click it the text will be translated from the language detected in the field to the language set in your user profile.
Now you can add the Dynamic Translation attribute to any other fields you wish to translate. You can also utilise the Dynamic Translation API to carry out translations in scripts. More info on that here.
Are you New York ready? For advice on upgrading and to start using these great new features reach out to us here, or email me at: nick.bain@vorto.co


